This article is part of a series.
Prev: «How To Make a Roguelike: #6 Entity Interactions Next: How To Make a Roguelike: #8 Combat and Damage »
Last time we added interactions between our entities and taught the Player how to dig. Now it is time to add one of the most important things to our game: monsters!
Implementing our First Monster
Monsters are an integral part of any roguelike game, and they come in all varieties. They might be able to patrol the dungeon, pick up items, use them, and even perform magic. Thanks to the SEA model we use it is easy to mix and match these things, but let’s start with something very simple: a stationary monster. In our case this will be a simple fungus creature which just sits in the cave.
For this we’re going to need a new EntityType, Fungus:
// add this to EntityTypes.kt
object Fungus : BaseEntityType(
    name = "fungus"
)
Since this is a completely new Entity in our game we’ll also need to add a tile for it
with a color:
// Add this to GameColors
val FUNGUS_COLOR = TileColor.fromString("#85DD1B")


// Add this to GameTileRepository
val FUNGUS = Tile.newBuilder()
    .withCharacter('f')
    .withBackgroundColor(GameColors.FLOOR_BACKGROUND)
    .withForegroundColor(GameColors.FUNGUS_COLOR)
    .buildCharacterTile()
Then writing a factory method to create it becomes trivial:
// put these in EntityFactory.kt

import com.example.cavesofzircon.attributes.types.Fungus

fun newFungus() = newGameEntityOfType(Fungus) {
    attributes(BlockOccupier,
            EntityPosition(),
            EntityTile(GameTileRepository.FUNGUS))
    facets()
    behaviors()
}
Now in order to see fungi in our game we only need to create some when we build the Game. Let’s now think about how we’re gonna control the number of fungi we add. It is always a good idea to separate configuration from actual game code because if we want to change either we don’t want to deal with the other. Another reason for having separate config files is to enable our players to change their configs if they want. (Remember those .ini files in old games?) We already have GameConfig so let’s add it there:
// add this to GameConfig
const val FUNGI_PER_LEVEL = 15
Then we can modify the GameBuilder to accommodate fungi.
It is usually a good idea to create abstractions for common functionality to make the code simpler. Now we’re going to perform a little Refactoring with this goal.
First let’s add an extension function to GameEntity which will enable us to add it to our game world. We create an extension function instead of a regular one because this will keep our code fluent and readable as you’ll see in the code:
// add these to GameBuilder

import org.hexworks.amethyst.api.entity.EntityType
import org.hexworks.zircon.api.data.Size
import org.hexworks.zircon.api.data.Position3D

private fun <T : EntityType> GameEntity<T>.addToWorld(             // 1
    atLevel: Int,                                                  // 2
    atArea: Size = world.actualSize.to2DSize()): GameEntity<T> {   // 3
    world.addAtEmptyPosition(this,
        offset = Position3D.defaultPosition().withZ(atLevel),      // 4
        size = Size3D.from2DSize(atArea))                          // 5
    return this
}
Here we:
- Add this extension method to any
GameEntityand we use theTgeneric type parameter to preserve the type in the return value to out function atLevelwill be used to supply the level at which we want to add theEntityatAreaspecifies the size of the area at which we want to add theEntitythis defaults to the actual size of the world (the whole level). this function returns theGameEntitywhich we called this function on which allows us to perform Method Chaining- We call
addAtEmptyPositionwith the supplied level - and we set the size using the supplied
Size
It is a good practice to make small incremental improvements to our program whenever we see a common usage pattern emerge or when we just realize that something can be implemented in a better way. This is called The Boy Scout Rule.
Now the new functions to create the player and the fungi become simpler and more readable:
// add these to GameBuilder

import com.example.cavesofzircon.GameConfig.FUNGI_PER_LEVEL

private fun addPlayer(): GameEntity<Player> {
    return EntityFactory.newPlayer().addToWorld(
        atLevel = GameConfig.DUNGEON_LEVELS - 1,
        atArea = world.visibleSize.to2DSize())
}

private fun addFungi() = also {
    repeat(world.actualSize.zLength) { level ->
        repeat(FUNGI_PER_LEVEL) {
            EntityFactory.newFungus().addToWorld(level)
        }
    }
}
and we just need to add addFungi to the buildGame function:
fun buildGame(): Game {

    prepareWorld()

    val player = addPlayer()
    addFungi()

    return Game.create(
        player = player,
        world = world
    )
}
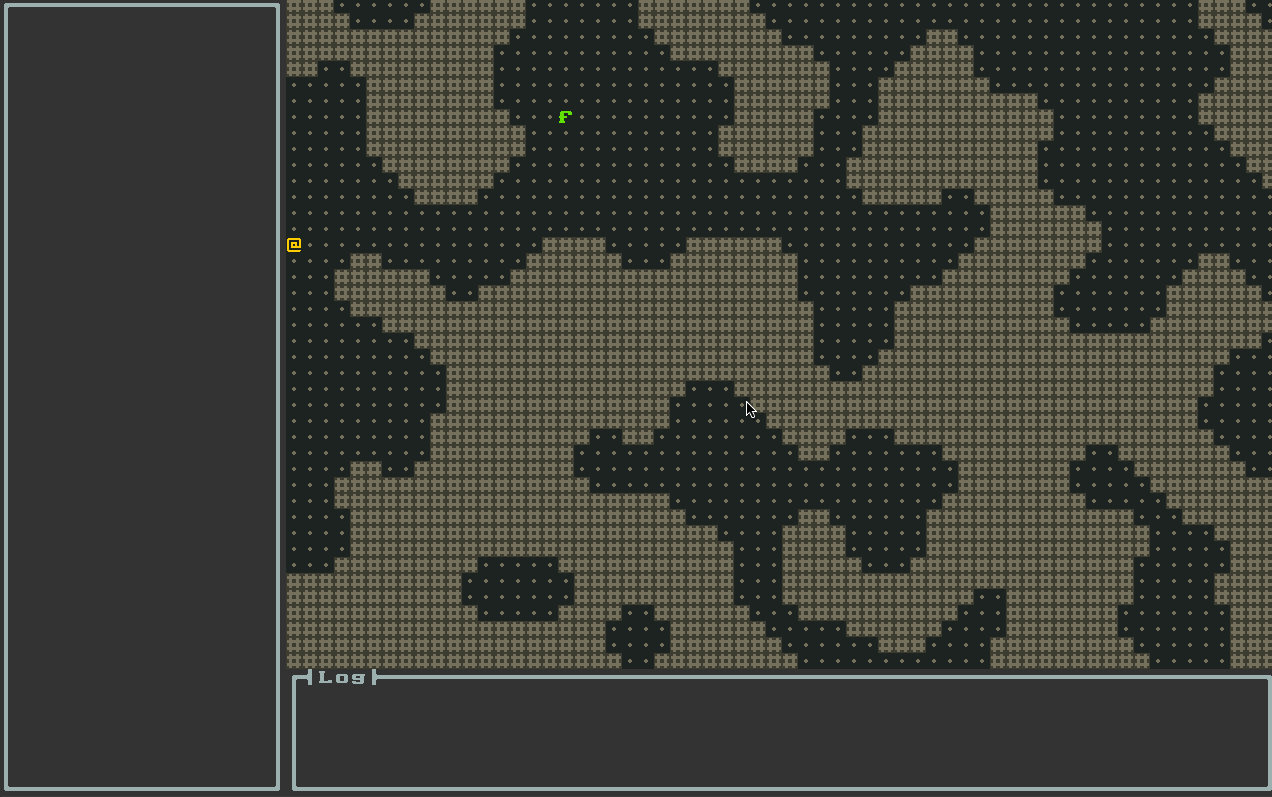
Now if we start the game we can see this:

As you can see, now fungi are present, but we can’t really do anything with them. They do occupy a block so we can’t walk over them, but there is not much else. Let’s see how can we make them Attackable! As you might have guessed we’re going to need the usual Command + Facet pair for this, Attack and Attackable. Since entities will perform Attack we make it an EntityAction:
package com.example.cavesofzircon.messages

import com.example.cavesofzircon.extensions.GameEntity
import com.example.cavesofzircon.world.GameContext
import org.hexworks.amethyst.api.entity.EntityType

data class Attack(
    override val context: GameContext,
    override val source: GameEntity<EntityType>,
    override val target: GameEntity<EntityType>
) : EntityAction<EntityType, EntityType>
and Attackable will accept this Message:
package com.example.cavesofzircon.systems

import com.example.cavesofzircon.messages.Attack
import com.example.cavesofzircon.world.GameContext
import org.hexworks.amethyst.api.Consumed
import org.hexworks.amethyst.api.Response
import org.hexworks.amethyst.api.base.BaseFacet

object Attackable : BaseFacet<GameContext, Attack>(Attack::class) {
    override suspend fun receive(message: Attack): Response {
        val (context, _, target) = message
        context.world.removeEntity(target)
        return Consumed
    }
}
This is going to be super simple now: when we Attack and Entity it is an instant kill, we just remove the the target from the world altogether and report that we Consumed the Message.
Later we will add combat stats, experience, and things like that but this will do as a first implementation.
It is a common pitfall which game developers fall into that they try to implement everything in their game in the first version. This won’t work in most of the cases. What is usually better if we do something which is good enough and improve on it later. This is also what Agile Development is about.
Now let’s add Attackable to our fungus entity and Attack as a possible EntityAction to our player and see what happens!
// add these to EntityFactory.kt

import com.example.cavesofzircon.messages.Attack
import com.example.cavesofzircon.systems.Attackable

// modify these functions in EntityFactory
fun newPlayer() = newGameEntityOfType(Player) {
    attributes(
        EntityPosition(),
        EntityTile(GameTileRepository.PLAYER),
        EntityActions(Dig::class, Attack::class)
    )
    behaviors(InputReceiver)
    facets(Movable, CameraMover)
}

fun newFungus() = newGameEntityOfType(Fungus) {
    attributes(
        BlockOccupier,
        EntityPosition(),
        EntityTile(GameTileRepository.FUNGUS)
    )
    facets(Attackable)
    behaviors()
}
Moving into fungi will now destoy them!
Nice!
Fungi Gardening
Having fungi in our World is nice but in a good game each creature has unique properties which makes the game interesting. If we sit down and think about what fungi does the first thing that might come into mind is that it is supposed to be Growing! There should also be a limit to the maximum size a fungus colony can spread. We’ll define an Attribute for this. Let’s take a look at how these things work. First, we add a configuration property to maximum fungus spread:
// Add this to GameConfig
const val MAXIMUM_FUNGUS_SPREAD = 20
then we introduce an attribute which will hold our current colony size:
package com.example.cavesofzircon.attributes

import com.example.cavesofzircon.GameConfig
import org.hexworks.amethyst.api.base.BaseAttribute

data class FungusSpread(
    var spreadCount: Int = 0,
    val maximumSpread: Int = GameConfig.MAXIMUM_FUNGUS_SPREAD
) : BaseAttribute()
The Growing itself is a Behavior, since a fungus can grow on its own:
package com.example.cavesofzircon.systems

import com.example.cavesofzircon.attributes.FungusSpread
import com.example.cavesofzircon.builders.EntityFactory
import com.example.cavesofzircon.extensions.position
import com.example.cavesofzircon.extensions.tryToFindAttribute
import com.example.cavesofzircon.world.GameContext
import org.hexworks.amethyst.api.base.BaseBehavior
import org.hexworks.amethyst.api.entity.Entity
import org.hexworks.amethyst.api.entity.EntityType
import org.hexworks.zircon.api.data.Size3D

object FungusGrowth : BaseBehavior<GameContext>(FungusSpread::class) {       // 1

    override suspend fun update(entity: Entity<EntityType, GameContext>, context: GameContext): Boolean {
        val world = context.world
        val fungusSpread = entity.tryToFindAttribute(FungusSpread::class)   // 2
        val (spreadCount, maxSpread) = fungusSpread                         // 3
        return if (spreadCount < maxSpread && Math.random() < 0.015) {      // 4
            world.findEmptyLocationWithin(
                offset = entity.position
                    .withRelativeX(-1)
                    .withRelativeY(-1),
                size = Size3D.create(3, 3, 0)
            ).map { emptyLocation ->
                world.addEntity(EntityFactory.newFungus(fungusSpread), emptyLocation)   // 5
                fungusSpread.spreadCount++
            }
            true
        } else false
    }
}
Here:
- We create a
Behaviorand supplyFungusSpreadas a mandatoryAttributeto it - When
updateis called with anentitywe try to find itsFungusSpreadAttribute. We know that it is there so we don’t have to use thefindAttributemethod. - Destructuring works for
FungusSpreadbecause it is adata class - You can specify any probability here. It will have a direct effect on how often fungus spreads. Feel free to tinker with this number but don’t be surprised if you find yourself in a fungsplosion!
- Note that we pass
fungusSpreadas a parameter tonewFungus(which we’ll modify momentarily) so that all fungi in the same fungus colony can share thisAttribute. This makes sure that fungus won’t spread all over the place and the size of a colony is controlled
A quick refresher: data classes give us a lot of useful features like destructuring, a useful
toStringmethod and more!
Finally we update the factory method of fungus to use the new things we created:
// add these to EntityFactory.kt

import com.example.cavesofzircon.attributes.FungusSpread
import com.example.cavesofzircon.systems.FungusGrowth

fun newFungus(fungusSpread: FungusSpread = FungusSpread()) = newGameEntityOfType(Fungus) { // 1
    attributes(
        BlockOccupier,
        EntityPosition(),
        EntityTile(GameTileRepository.FUNGUS),
        fungusSpread                                // 2
    )
    facets(Attackable)
    behaviors(FungusGrowth)                         // 3
}
Our modifications are:
- We added the
fungusSpreadas a parameter tonewFungusand it also has a default value. This enables us to call it with aFungusSpreadobject when the fungus grows and use the default when we create the first one in the builder - We pass the
fungusSpreadparameter to our builder so it will use whatever we supplied instead of creating one by hand - We also add
FungusGrowthwhich we created now
Wait, isn’t shared mutable state is the quintessence of evil and ruin? In most cases yes, buthere we Amethyst handles the updating of our entities so we’re safe to tamper with state.
Now let’s take a look at what we proudced!
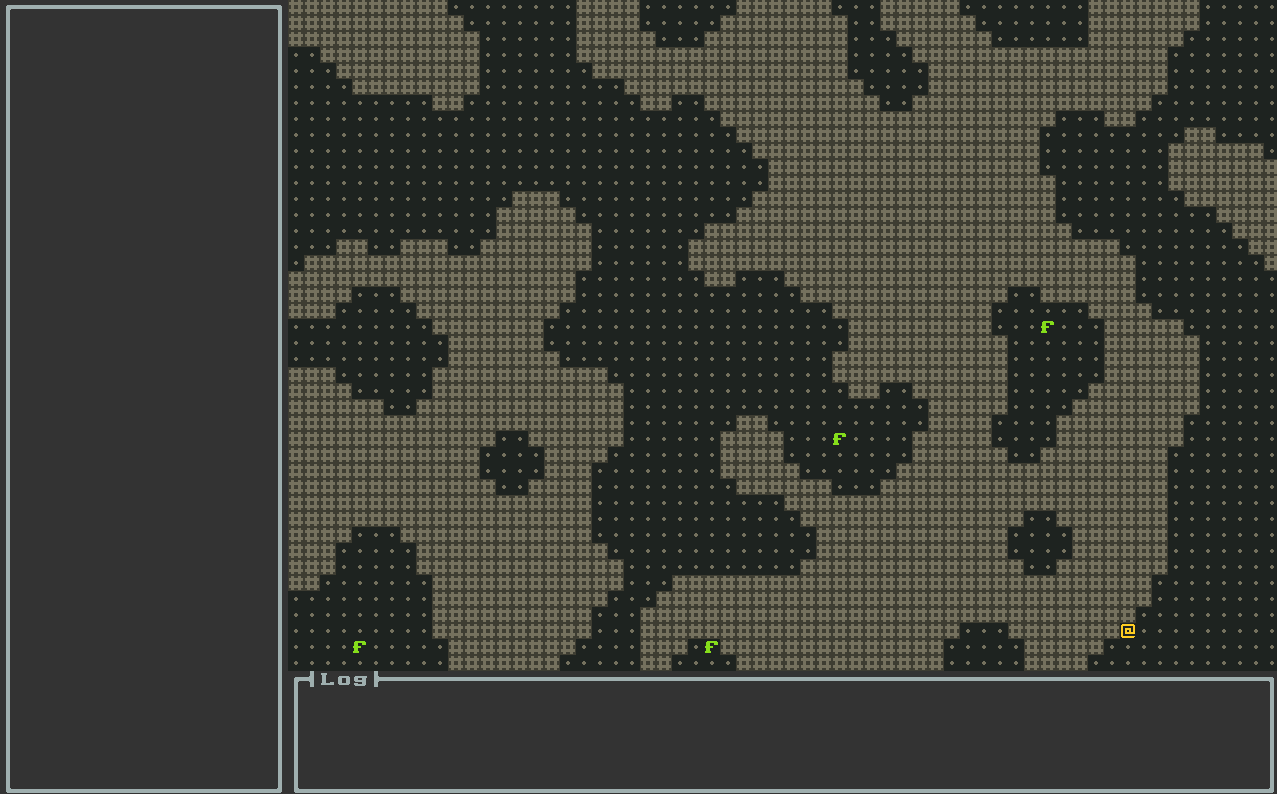
Wow, that’s cool!
Conclusion
Adding our first monster was easy, it seems that we’re starting to reap the benefits of using a system which was designed for this kind of usage. Upgrading our fungus was also straightforward! In the next article we’re going to add some real combat to our game with hit points, damage and combat messages!
Until then go forth and kode on!
The code of this article can be found in commit #7.