This article is part of a series.
Prev: «How To Make a Roguelike: #13 Food and Hunger Next: How To Make a Roguelike: #15 Weapons and Armor »
We know a lot of things about our character. We know how hungry we are, what items we have and the amount of hp we have. The problem is that we can’t see these values on the screen, so in this article we’re going to add them!
A Primer on Data Binding
In this session we’re going to use a feature that comes with Zircon called data binding. This might be familiar to you if you have used some fat client library, like JavaFX or SWT but we’re going to take a look at it now.
In a nutshell data binding is responsible for binding the data stored in variables to other variables. For this purpose we can use properties:
import org.hexworks.cobalt.databinding.api.createPropertyFrom
import org.hexworks.cobalt.databinding.api.property.Property

val myVal: Property<Int> = createPropertyFrom(1)

println(myVal.value) // 1
This code above creates a Property object with a value of 1. So as we can see a Property is just a wrapper for an actual value, but it adds some handy features that we can use to perform complex data binding operations. The basis of data binding is listening to changes:
import org.hexworks.cobalt.databinding.api.createPropertyFrom
import org.hexworks.cobalt.databinding.api.property.Property

val myVal: Property<Int> = createPropertyFrom(1)

myVal.onChange { changeEvent ->
    println("old: ${changeEvent.oldValue}, new: ${changeEvent.newValue}")
}

myVal.value = 2

// old: 1, new: 2
As you can see with a change listener we can do anything we want when the value of a property changes. Since Kotlin supports property delegation we can also make a regular Kotlin property out of our data binding Property:
import org.hexworks.cobalt.databinding.api.createPropertyFrom
import org.hexworks.cobalt.databinding.api.property.Property

val myProp: Property<Int> = createPropertyFrom(1)

val myVal: Int by myProp.asDelegate()

myProp.value = 2

println(myVal) // 2
This is very useful already but there is more! We don’t have to use these change listeners all the time because Property comes with handy binding operations:
import org.hexworks.cobalt.databinding.api.createPropertyFrom
import org.hexworks.cobalt.databinding.api.property.Property

val myProp: Property<Int> = createPropertyFrom(1)

val myOtherProp = createPropertyFrom(2)

myOtherProp.bind(myProp)

println(myOtherProp.value)  // 1

myProp.value = 3

println(myOtherProp.value)  // 3

myOtherProp.value = 4

println(myProp.value) // 4
So as you can see bind creates a two-way binding. The changes to a property are reflected in the other. We can also create Bindings too:
import org.hexworks.cobalt.databinding.api.binding.Binding
import org.hexworks.cobalt.databinding.api.createPropertyFrom
import org.hexworks.cobalt.databinding.api.binding.bindPlusWith

val firstName = createPropertyFrom("John")
val lastName = createPropertyFrom("Doe")
val fullName: Binding<String> = firstName
    .bindPlusWith(createPropertyFrom(" "))
    .bindPlusWith(lastName)

firstName.value = "Jane"

println(fullName.value) // Jane Doe
Here we define fullName as a Binding that is calculated by concatenating firstName and lastName with a space between them!
We can combine these functions in any way we want and we can also bind the contents of our Zircon Components using this feature.
There are also operations defined for numbers, like add or multiply:
import org.hexworks.cobalt.databinding.api.createPropertyFrom
import org.hexworks.cobalt.databinding.api.binding.bindPlusWith

val first = createPropertyFrom(1)
val second = createPropertyFrom(2)

val sum = first.bindPlusWith(second)

first.value = 3

println(sum.value) // 5
Booleans:
import org.hexworks.cobalt.databinding.api.createPropertyFrom
import org.hexworks.cobalt.databinding.api.binding.bindNot

val first = createPropertyFrom(false)

val negation = first.bindNot()

first.value = true

println(negation.value) // false
and there are conversions:
import org.hexworks.cobalt.databinding.api.createPropertyFrom

val num = createPropertyFrom(1)

val boolValue = createPropertyFrom(false)

boolValue.updateFrom(num) { value -> // updateFrom creates a one-way binding
    value != 0
}

println(boolValue.value) // true

num.value = 0

println(boolValue.value) // false
Displaying Attributes
Now armed with this knowledge let’s think about how we can easily display the Attributes we have. The ones we are interested in are CombatStats and EnergyLevel. There are a lot of options to consider here and we’re going to go for the one that’s probably the simplest: Adding a new interface named DisplayableAttribute:
package com.example.cavesofzircon.attributes

import org.hexworks.amethyst.api.Attribute
import org.hexworks.zircon.api.component.Component

interface DisplayableAttribute : Attribute {

    fun toComponent(width: Int): Component

}
What this does is that the implementors will have to write a toComponent function which will create a Zircon Component out of an Attribute.
For our implementations we’re going to add an extension function to Property:
package com.example.cavesofzircon.extensions

import org.hexworks.cobalt.databinding.api.extension.createPropertyFrom
import org.hexworks.cobalt.databinding.api.property.Property

fun Property<Int>.toStringProperty(): Property<String> {
    val intProp = this
    return createPropertyFrom("").apply {
        this.updateFrom(intProp) {
            it.toString()
        }
    }
}
The above code is a good example of augmenting existing functionality where we can’t modify the source. In our case the code for Property is part of Zircon, but we want to add a function which converts a Property<Int> to a Property<String>. This function above does exactly that. This is also a testament to the power of extension functions! Now back to our attributes…
First, we are going to modify CombatStats that already has the proper properties (pun intended) in place:
package com.example.cavesofzircon.attributes

import com.example.cavesofzircon.extensions.toStringProperty
import org.hexworks.amethyst.api.base.BaseAttribute
import org.hexworks.cobalt.databinding.api.binding.bindPlusWith
import org.hexworks.cobalt.databinding.api.extension.createPropertyFrom
import org.hexworks.cobalt.databinding.api.extension.toProperty
import org.hexworks.cobalt.databinding.api.property.Property
import org.hexworks.zircon.api.Components

data class CombatStats(
    // ...
) : BaseAttribute(), DisplayableAttribute {

    // ...

    override fun toComponent(width: Int) = Components.vbox()
        .withSize(width, 5)                                             // 1
        .build().apply {

            val hpLabel = Components.label()                            // 2
                .withSize(width, 1)
                .build()
            val attackLabel = Components.label()
                .withSize(width, 1)
                .build()
            val defenseLabel = Components.label()
                .withSize(width, 1)
                .build()

            hpLabel.textProperty.updateFrom(
                createPropertyFrom("HP: ")                              // 3
                    .bindPlusWith(hpProperty.toStringProperty())        // 4
                    .bindPlusWith("/".toProperty())
                    .bindPlusWith(maxHpProperty.toStringProperty())
            )

            attackLabel.textProperty.updateFrom(
                createPropertyFrom("Att: ")
                    .bindPlusWith(attackValueProperty.toStringProperty())
            )

            defenseLabel.textProperty.updateFrom(
                createPropertyFrom("Def: ")
                    .bindPlusWith(defenseValueProperty.toStringProperty())
            )

            addComponent(
                Components.textBox(width)       // 5
                    .addHeader("Combat Stats")
            )
            addComponent(hpLabel)
            addComponent(attackLabel)
            addComponent(defenseLabel)

        }

    // ...
}
Here we:
- Create a
VBoxthat automtaically aligns its children from top to bottom - Create
Labels for each stat we want to display (hp, attack, defense) - Start updating their
textPropertyfrom ourAttributes - Use the previously created
toStringPropertyfunction - Add all the labels to our
VBox
EnergyLevel is pretty similar:
package com.example.cavesofzircon.attributes

import com.example.cavesofzircon.extensions.toStringProperty
import org.hexworks.amethyst.api.base.BaseAttribute
import org.hexworks.cobalt.databinding.api.binding.bindPlusWith
import org.hexworks.cobalt.databinding.api.extension.createPropertyFrom
import org.hexworks.cobalt.databinding.api.extension.toProperty
import org.hexworks.zircon.api.Components

class EnergyLevel(
    // ...
) : BaseAttribute(), DisplayableAttribute {

    // ...

    override fun toComponent(width: Int) = Components.vbox()
        .withSize(width, 5)                             // 1
        .build().apply {

            val hungerLabel = Components.label()        // 2
                .withSize(width, 1)
                .build()

            hungerLabel.textProperty.updateFrom(
                currentValueProperty.toStringProperty() // 3
                    .bindPlusWith("/".toProperty())
                    .bindPlusWith(maxEnergy.toString().toProperty())
            )

            addComponent(
                Components.textBox(width)               // 4
                    .addHeader("Hunger")
            )
            addComponent(hungerLabel)

        }

}
We:
- Create a
VBox - Create a
Label - Bind it to our current/max energy
- And add the
Labelto the box
Putting It Together
Now we have our displayable properties in place we just need to add them to our game. For this we’re going to create a Fragment which will contain the stats:
package com.example.cavesofzircon.view.fragment

import com.example.cavesofzircon.attributes.DisplayableAttribute
import com.example.cavesofzircon.attributes.types.Player
import com.example.cavesofzircon.extensions.GameEntity
import org.hexworks.zircon.api.Components
import org.hexworks.zircon.api.component.Fragment

class PlayerStatsFragment(
    width: Int,
    player: GameEntity<Player>
) : Fragment {

    override val root = Components.vbox()
        .withSize(width, 30)                                                    // 1
        .withSpacing(1)                                                         // 2
        .build().apply {
            addComponent(Components.header().withText("Player"))                // 3
            player.attributes.toList().filterIsInstance<DisplayableAttribute>() // 4
                .forEach {
                    addComponent(it.toComponent(width))                         // 5
                }
        }
}
Which:
- Is composed of a
VBox - Which has a spacing of
1between its children - Has a
Headerwith the text"Player" - And we filter all the
player’s attributes forDisplayableAttribute - And call
toComponenton them
As for displaying this we just add this to PlayView:
// modify PlayView with these

// new import
import com.example.cavesofzircon.view.fragment.PlayerStatsFragment

class PlayView(
    // ...
) : BaseView(grid, theme) {

    init {
        val sidebar = /* ... */

        // add the fragment
        sidebar.addFragment(
            PlayerStatsFragment(
                width = sidebar.contentSize.width,
                player = game.player
            )
        )

        // ...
    }
}
As you can see by using Fragments this is rather straightforward.
Let’s see what we created:
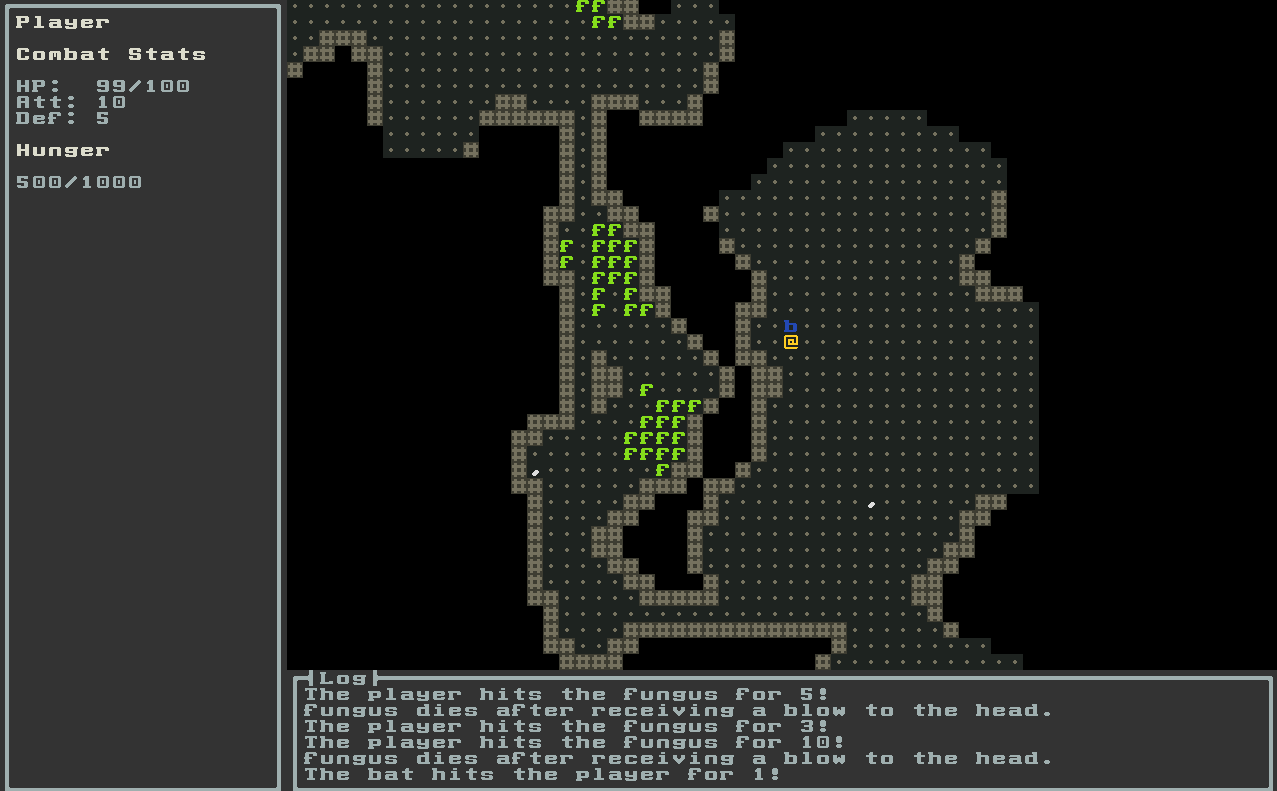
As you can see as we get hit by the bat our hp decreases, and after eating our energy is restored!
Conclusion
We’ve added as stats panel with the added bonus that it auto-updates without having to write a lot of code. We’ve learned that data binding is a powerful tool if used in the right place. In the next article we’re going to add some new items into our game: weapons and armor!
Until then go forth and kode on!
The code of this article can be found in commit #14.